Some of you are interested in using Survey123 for ArcGIS against your own ArcGIS for Server, so today we will describe succinctly how you can make that happen.
Survey123 for ArcGIS requires Portal for ArcGIS 10.3.1. Portal for ArcGIS is an extension to ArcGIS for Server and it is included at no additional cost with the Standard and Advanced editions of it. Typically, the Portal for ArcGIS license comes bundled with a good set of ArcGIS named accounts, which you will be able to use from the Survey123 for ArcGIS mobile app.
Your Portal for ArcGIS 10.3.1 must be configured with a Hosted Server. Creating a Hosted Server involves a handful of steps.
- First you need to install ArcGIS for Server
- You will also need to install the ArcGIS Data Store and register it with your ArcGIS Server instance.
- Once your ArcGIS for Server instance and the Data Store are coupled, you will federate your ArcGIS Server instance with your Portal for ArcGIS, and designate it as your Hosted Server
For details on this, check the Configure a Hosting Server with your Portal help topic.
Finally, at the moment, Survey123 for ArcGIS is limited to using built-in users. If you would like to use enterprise identity stores you are out of luck for now. We expect having this in the future.
Configuring ArcGIS for Server, the ArcGIS Data Store and Portal for ArcGIS is probably where you will spend most of your time. Once you have that in place, things are as follows:
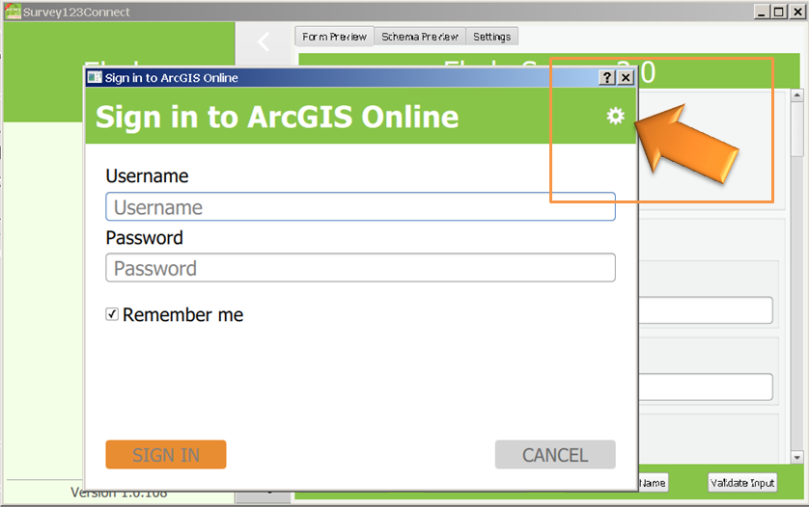
Survey123 Connect: When you are ready to publish your survey to ArcGIS, you need to sign in from Survey123 Connect. As you know, by default Connect is configured to log you into ArcGIS Online, but you can click on the settings button as highlighted in the next screenshot and change the target portal.
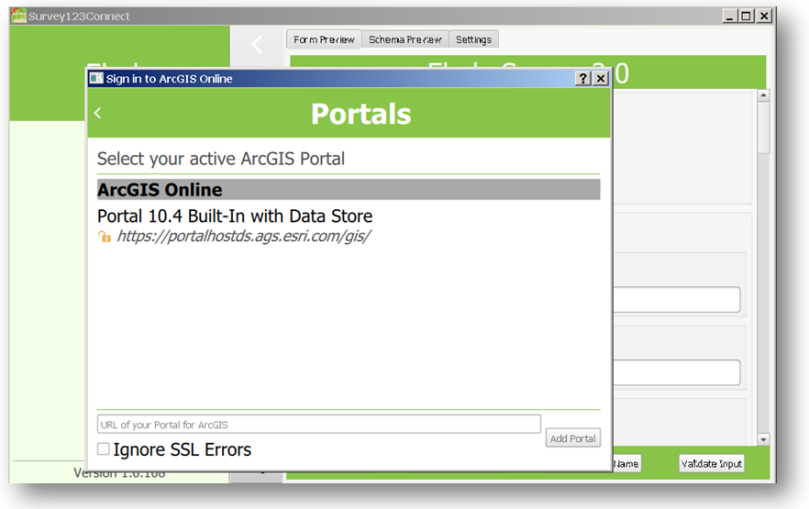
Clicking on the settings will allow you add the URL of your own Portal for ArcGIS. Just a couple of tips: make sure you use the https protocol if your portal is configured to use https only, and do not forget to include the instance name of your portal. For example, in my case below the instance name of my portal is ‘gis’, but by default the instance name is ‘arcgis’. You can really choose the instance name of your portal to be whatever you want… this is done during the installation of Portal for ArcGIS. Just make sure you get the correct instance name in this dialog.
To go back to the login dialog, simply click on the arrow at the top left corner and log in with your Portal for ArcGIS credentials.
At this moment, you should be able to publish your own Surveys into Portal for ArcGIS.
Your surveys in Portal for ArcGIS
Unfortunately, as of now we do not have instructions for you to setup your own Survey123 web site. So you will not have access to the Survey Gallery, or the View Results section. In any event, we will show you how to get going…
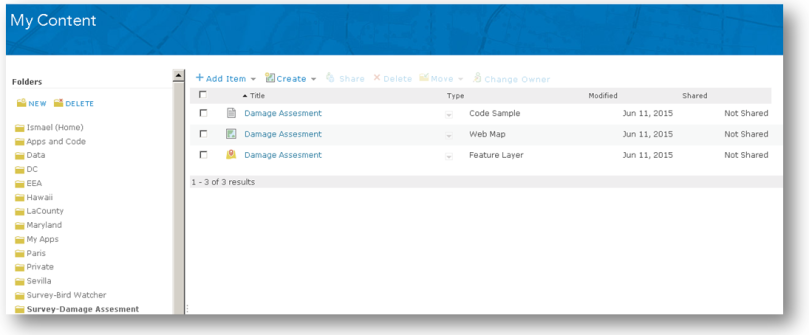
When you create a new Survey, we create a folder under your Contents. All the Survey123 for ArcGIS folders have the prefix survey as shown in the next screenshot.
Within that folder, you will typically find a Feature Layer (the feature service), and a Code Sample item (the actual survey with all its assets). If you decided to create one at publishing time, you will also find a Web Map.
If you would like users with the Survey123 for ArcGIS mobile app to access your survey, you will need to share with them both the Code Sample item as well as the Feature Layer. You need to make sure you are consistent… If you fail to share the survey (Code Sample item), then it will not be possible for field users to download it into their devices. If you do not share the feature layer, folks in the field will be unable to submit any of their observations.
Typically, you will share surveys as follows:
- Select and existing Group in your Portal or create one if needed
- Make sure that everyone that should have access to your survey is in that Group
- Go into your survey folder and share both the survey (Code Sample) and feature service (Feature layer) with that Group
- From the Survey123 for ArcGIS app, login and download your survey
The Survey123 for ArcGIS mobile app
Similarly to what we did in Connect, you can easily make your app point to your own Portal for ArcGIS. In the signin dialog you access the Settings (button in the top-right corner of the signin dialog) and type the URL of your own Portal for ArcGIS, then login with your Portal for ArcGIS credentials.
Both Connect and the Survey123 for ArcGIS mobile app will remember the last portal you chose, so you will not need to go into the settings every time you want to login. You can of course, switch back into ArcGIS Online or any other portal at any time…
We have had multiple organizations successfully use Survey123 for ArcGIS against their own ArcGIS for Server. We have also seen folks getting stuck with a few things, so here are some tips:
- The version of ArcGIS for Server and Portal for ArcGIS is important: 10.3.1
- You must configure your Portal with a Hosted Server and your Hosted Server must have an ArcGIS Data Store. You cannot use your own enterprise data store… it must be the ArcGIS Data Store.
- Do not attempt to use Windows or PKI authentication… it does not work yet with Survey123. You must use the default token-based authentication with built-in users.
- If you used a self-signed certificate to configure your Portal for ArcGIS you are looking for trouble. Best to use a domain certificate or one issued by a trusted authority
- When typing the URLs in Connect and Survey 123 use https and make sure you get the instance name correct.
- Some people have chosen to run Portal for ArcGIS completely behind their firewall. That is fine as long as you are conscious that your smartphone will not be able to download or submit surveys while in the field… that unless you connect through VPN.
- Survey123 Connect ALWAYS requires access to the internet in order to validate your forms. This is because our survey validation web service runs in ArcGIS Online and we have not provided you instructions to set it up in your own infrastructure yet. Remember that this does not imply that your data will be in ArcGIS Online… this just implies that when you are authoring your survey in Connect you must use an ArcGIS Online service to preview and validate your survey in Connect. This is a limitation that will disappear once we get the setup instructions for the Survey123 web site and its associated validation service in place.


